
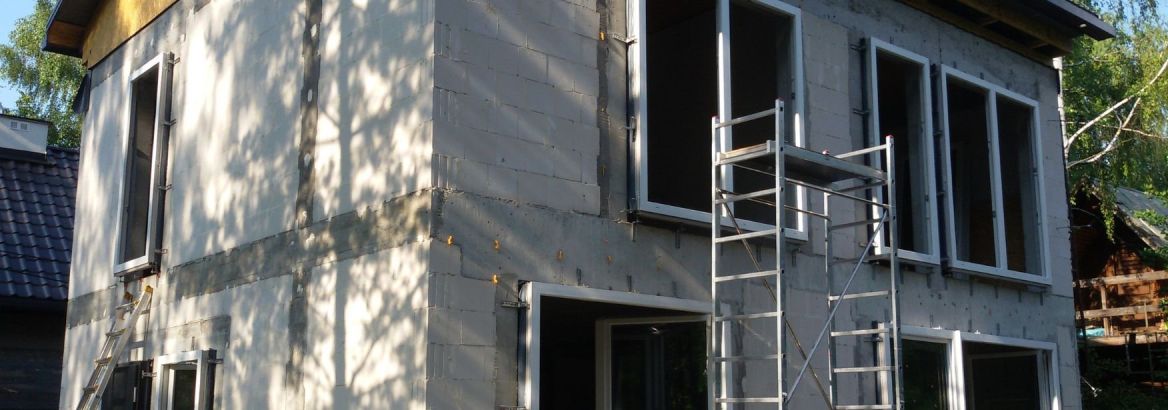
A young investor from the vicinity of Warsaw, Łukasz Kornecki, wanted to build a house in a quiet, forest corner. Aware of the advantages of energy-saving construction, he was looking for a project and solutions that would allow this idea to be implemented in a short time. The design was developed by Pracownia Architektoniczna MIDI from Gdańsk, with the help of Piotr Karaś. The design of a real passive house was created on the drawing board, the shape and appearance of which was dictated by the specific location of the plot - among tall trees, where nature will draw the view from the windows every day. Corrections were made, among others, the shape of the windows, all of which were to reach the floor, and their color - henceforth white, less susceptible to heating. The investor quickly started the project. Preparation of the plot by fencing the area, removing several trees, erecting a temporary shed-house, geotechnical research, embedding the foundation slab in the ground, supplying electricity and water, making waterproofing, erecting load-bearing walls, embedding the roof truss and roofing - in short. Reaching the raw and open state is the time to make final decisions on the selection of appropriate window and door joinery and adequate, tight assembly. The investor entrusted this stage of construction to the mobile company LANGER OKNA, whose owner, Marcin Marchewka, is the Ambassador of the next edition of the Good Installation educational campaign conducted by the Polish Windows and Doors Association. Many hours of arrangements, refining details, measurement at the investment site, preparation of the assembly project and implementation.
Aluplast windows based on the energy-saving IDEAL 8000 system were proposed and selected. Layered assembly in the insulation layer, in the KNELSEN fastening system and TYTAN Pro Energy System sealing elements were designed. Part of the preparations for the assembly was the construction of temporary stairs to the first floor, through which the sashes of the windows will be carried. They were prepared by the investor's father - an experienced carpenter who corrected the carpenter's work during the assembly of the truss, when it turned out that they lacked experience. The ingenious stairs with a platform turned out to be very solid, and they will also be used by other construction teams in further work on the project. Installation of woodwork in a passive house is a very important stage from the point of view of the house's tightness, effective separation from external influences - wind, low and high temperature, precipitation and humidity, and noise - hm.. noise in the forest?... As a result, windows that are the thinnest element of the wall, they are largely responsible for the balance of heat losses and gains and the appropriate climate inside the house with an optimal level of humidity - in other words, for the comfort of staying at home.
Effective sealing of the connection between the structure and the wall is possible after proper preparation of the reveals, and in the case of installation in the insulation layer, also the outer surfaces of the wall around the reveals, on which Styrofoam bands, most often graphite, are glued in the Knelsen system. Planes should be leveled, unevenness and cavities filled, and surfaces smoothed. Preparations also include arranging windows for the right openings and work on the woodwork itself - sticking vapor barrier tapes, combining frames into sets with appropriate sealing (usually an expansion tape between each element), equipping with Knelsen system fasteners, remembering about the correct spacing of fasteners, which is determined by the weight and shape of the joinery, and even its unusual functions that require smaller spacing between the fixing points.
.jpg)
The built-in structural post in one frame does not provide adequate statics when tall and wide structures are divided into many sashes. Large structures sometimes require division into separate elements and connecting them with a static connector. There is no room for any compromise here. Also in the case of this investment, one structure was divided into two frames and connected with a static connector, using expansion tape for this purpose. Other critical elements of frames and joints also require additional sealing, e.g. at the junction of the frame with the threshold strip. Sealing in these places prevents the penetration of air and moisture, and as a result, lowering heating costs, including even the costs of operating the recuperator, which is not activated unnecessarily. Since each of the windows was to reach the floor, it was necessary to apply the so-called benchmarks marked with a triangle whose base turned upwards is a level mark (previously benchmarks were marked during the measurement), in order to be able to assemble the woodwork precisely at the same level on the ground floor and first floor. Working benchmarks marked on the wall are used to mark the geodetic level at each window opening by transferring the level mark using a laser level (the laser beam covering the benchmark marker transfers the level to each plane within the laser range).
You can also use the longest possible manual spirit level to trace the level from it with a drawn line further and further on the wall to a place from which it will be easy to determine the height of the bottom edge of the window. Once everything was ready, the actual assembly could begin. First, the KNELSEN load-bearing consoles were attached to the wall from the outside, the window frames were mounted on them, and then pre-anchored with the side consoles, standing freely in the opening, allowed for precise setting of the height, levels, verticals and the distance from the wall face, which in this case was approx. 120mm. After these treatments, the frame could be finally attached to the jamb.
After hanging the wings, it was time to make the seal. Since the woodwork protrudes beyond the wall, the only way to seal it in this case was to first create a gap for the application of the mounting foam by gluing graphite polystyrene bands (λ=0.032 W/m²K) around the frames. The bands were glued to the wall with TYTAN EOS Elevation foam glue.
.jpg)
The resulting gap was sealed with energy-saving TYTAN ENERGY 2020 mounting foam, dedicated to passive construction, which, properly applied and not cut after drying, has the parameter U= 0.033 W/m*K with a dried foam braid with a width of 60 mm in the gap. However, before applying the foam, a vapor barrier tape was glued in the jambs, which is the inner layer of the seal, so that the applied foam could lean against it and thus fill the gap accurately. In favorable weather conditions that accompanied the team during the assembly, the assembly foam dried quickly, its increase was not excessive and allowed for the execution of the third, outer layer of sealing. It was a vapour-permeable tape, glued with one edge on the window frames, and with the remaining surface glued on the architraves, overlapping the wall, effectively covering the assembly foam. All consoles protruding from under the tape were additionally covered with sections of insulating tape.
When the goal is to achieve complete tightness of joinery connections with the wall, additional treatments are necessary to seal all joints, gaps, cable exits, etc. TYTAN ENERGY 2020 adhesive was used to seal narrow gaps and reed switch wire passages, which turns out to be an excellent sealant wherever the sealant should remain flexible after drying.
Particular attention should be paid to the tightness of the thresholds of the structure, which are the coldest element in the entire window, and are also exposed to leakage and air drafts. During the assembly, an aluminum tape covered entirely with butyl adhesive was used. It was glued to the frame threshold and to the XPS boards glued at the thresholds to the ceiling, thanks to which this connection remains tight.
The image was complemented by the warm WIKĘD Termo Prestige duo-color door, also installed in the insulation layer with a protrusion of 120 mm from the face of the wall. In this way, after several days of exhausting work, the assembly was completed and the effect was achieved. The passive house under construction has gained blush - inside it is quiet, dry and - what is desired on hot days - cool, despite the large glazing. The investor can proceed with further works inside and outside the building. Although it does not intend to certify the house, it stubbornly strives to achieve the Passive House standard. Everything indicates that the goal will be achieved. The more so that in terms of the selection of woodwork and assembly techniques, he completely relied on the experience of professionals in this field. At the end, Łukasz Kornecki, the investor, gave LANGER OKNA a short opinion: "The assembly was made perfectly with attention to every detail."
dom_pasyw_aluplast When building a passive house, compromises are not advisable. To achieve the effect, you should use solutions created for energy-saving construction. These are energy-saving windows designed consciously for this purpose, followed by layered assembly focused on tightness and maximum reduction of generated energy losses, ensuring measurable savings for users.


Realised by: Langer Okna, Marcin Marchewka
Photos: Marcin Marchewka